How to Make a WordPress Disaster Recovery Plan (Expert Tips)

Imagine you have poured your heart and soul into your WordPress website with a beautiful design, engaging content, and a growing audience. But then disaster strikes. Your website crashes, you’re locked out of your dashboard, or your data vanishes.
It sounds scary, but in our years of experience, it happens more often than you might think. Website downtime and data loss can be devastating.
This is where a WordPress disaster recovery plan comes in. It’s like an insurance policy for your website, ensuring you can quickly recover from any unexpected event.
In this guide, we will show you how to make a WordPress disaster recovery plan.

Why Do You Need a WordPress Disaster Recovery Plan?
Even though WordPress is a powerful and popular platform, unexpected events can still take down your website. A WordPress disaster recovery plan acts like a roadmap for restoring your website.
Here’s why it’s important to have one:
- Minimizes Downtime and Data Loss: Disasters can strike in many forms, from hacking attacks to accidental deletion of files. A recovery plan helps you get your WordPress site back up and running quickly, minimizing the amount of time your site is unavailable.
- Protects Your Reputation: A WordPress website outage can damage your reputation and erode user trust. A disaster recovery plan allows you to address the issue quickly and restore the user’s confidence.
- Ensures Business Continuity: If your website is important for your business, then a disaster recovery plan lowers the disruption to your operations. By getting your site back online quickly, you can limit revenue loss.
That said, let’s look at how to create a disaster recovery plan. You can click the links below to move to any step:
Step 1. Analyze Weak Areas of Your WordPress Site
Before you can protect your website, you need to know what you’re protecting it from. Start by thinking about the potential disasters that could impact your website.
For instance, server crashes, power outages, plugin conflicts, corrupted databases, and WordPress errors can temporarily make your site unavailable to users or restrict the user experience.
You can start by enabling the debug mode, checking the WordPress error logs, and then fixing each issue.

Another risk you need to consider is hackers trying to steal your data, inject malicious code, or hold your website hostage for ransom. Accidentally deleting important files, installing incompatible updates, or falling for phishing scams can also cause disasters.
You can try to find vulnerabilities and weak areas on your site that hackers can target. This involves out-of-date plugins, WordPress core files, themes, weak passwords, and more.
It is also a best practice to document everything on your site. This includes website login details, plugin and theme settings, custom code snippets, hosting account information, and emergency contact information for your hosting provider, security experts, or web developers.
You can also use a cloud storage service or a password manager to keep your documentation safe and accessible. This way, if something goes wrong, you can recover important information in an instant.
Step 2. Regularly Back Up Your WordPress Site
Once you’ve highlighted the weak areas, the next thing to do is back up all the important elements on your site. These include blog posts, landing pages, images, videos, theme files, customer information, comments, plugins, themes, CSS files, and more.
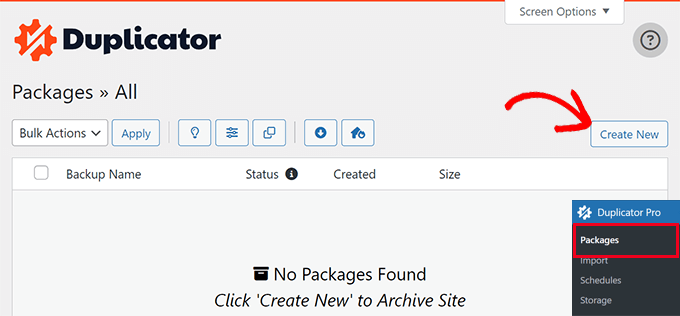
The easiest way to create WordPress backups is to use a plugin like Duplicator Pro. It is super easy to use for creating backup packages, along with migrating and cloning your site.
The WordPress backup plugin also includes more features like scheduled backups, recovery points, cloud storage integration, migration tools, and more.

You can also manually backup your site’s data using an FTP client, the File Manager in your hosting company’s cPanel or dashboard, or the phpMyAdmin panel.
For step-by-step details, please see our guide on how to back up your WordPress website.
With a fresh copy of your site ready, you can easily restore WordPress from the backup anytime a disaster occurs. This way, you can prevent data loss and get your site up and running in no time.
Step 3. Monitor WordPress Web Server Uptime
Another important tool to have in your disaster recovery plan is a server uptime monitor. Uptime is when your website is available to users on the Internet without any interruption.
These tools will monitor your site’s server and inform you whenever it’s down. If something goes wrong with your site, they will notify you immediately by email or SMS, allowing you to fix it as soon as possible.
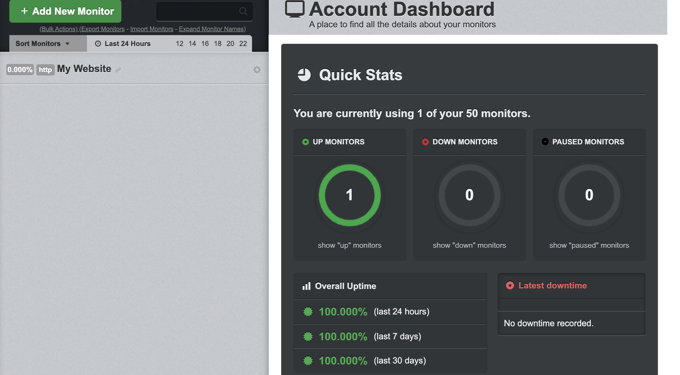
For example, you can use UptimeRobot to monitor uptime. The best part is that it is free, but you can also sign up for its premium plans to receive alerts via SMS, voicemail, email, and other channels.

For more uptime monitoring tools, you can follow our guide on how to monitor your WordPress website server uptime.
If you experience an outage or server downtime, then you’ll immediately know. The next step would be to clear the cache and DNS cache to see if your site is restored. Or you can reach out to your web hosting provider for assistance and ensure your site is back up and running.
Step 4. Strengthen Your Website Security
A secure website is a website that’s less likely to experience disasters in the first place. In a WordPress disaster recovery plan, you can strengthen your site’s security by:
- Choosing Strong Passwords: Use unique and complex passwords for all your website accounts. If you experience a disaster, then it’s critical that you replace all the passwords with new and strong ones.
- Enable Two-Factor Authentication: You should enable two-factor authentication to add an extra layer of security for all your logins.
- Keep Everything Updated: Regularly update your WordPress core, plugins, and themes to patch security vulnerabilities. In case something goes wrong, ensure that you update your plugins, themes, and core files after recovering from a backup.
- Use WordPress Security Plugins: Install WordPress security plugins like Sucuri to scan for malware, block suspicious activity, and monitor your website’s security.
- Add a Web Application Firewall (WAF): In addition to a security plugin, you should also use a WAF on your site. It will prevent malicious traffic from reaching your site and causing a disaster.
For more security tips, please see our ultimate guide to WordPress security.
Pro Tip: Has your WordPress site been hacked, and you’re not sure what to do? It might be time to call in the professionals.
With WPBeginner Hacked Site Repair, our team of experts will clean up malicious code, files, and malware and get your site back up and running in no time.
Step 5. Hire a WordPress Maintenance & Support Service
Another important part of your disaster recovery plan should be hiring WordPress experts who can fix problems quickly and restore your website.
There are many WordPress maintenance services you can choose from. They provide regular backups, monitor your site’s uptime, provide 24/7 support, optimize your site for speed, and help recover your website from any sort of disaster.
For instance, WPBeginner Pro Maintenance Services is the best support agency you can use for your website. We have over 15 years of experience in the industry and have helped more than 100,000 users with WordPress.

We will also ensure that your WordPress core, plugins, and themes are always up-to-date and that the latest updates won’t negatively affect your website’s performance.
Besides basic website maintenance, there are other services you can also get. These include website design, SEO services to boost traffic, speed optimization, emergency support, and more.
See the complete list of WPBeginner Pro Services.
Step 6. Test Your Disaster Recovery Plan
You won’t know how effective your WordPress disaster recovery plan is unless you actually test it.
For instance, you can simulate a disaster and test your plan by restoring your website from a backup to a local or staging environment. This will ensure that your backups are up to date or the scheduled backups are working correctly.
In case there is an error while restoring the backup or you feel an important element is missing in the backup files, then you can fix it during the simulation.
You should also ensure that your website is functioning correctly, all your data is intact, and everything is working as it should.
We hope this article helped you learn how to make a WordPress disaster recovery plan. You may also want to see our guide on how to contact WordPress support and eCommerce maintenance tips – how maintain your store.
If you liked this article, then please subscribe to our YouTube Channel for WordPress video tutorials. You can also find us on Twitter and Facebook.
The post How to Make a WordPress Disaster Recovery Plan (Expert Tips) first appeared on WPBeginner.